
Graphical User Interface
Antenna House Formatter V7.5 Windows versions have a Graphical User Interface (GUI). By using the GUI, you can easily initiate formatting and then view the formatted results in the WYSIWYG window prior to outputting to PDF or printing. You also have control over a number of formatting options, can set the options for PDF output and can direct files to any connected printer.
For developers, the GUI provides quick visual feedback of formatting results and has the added ability to save Area and FO Trees to aid in the development processes. In a large multi-page document, the pages can be browsed as they are formatted. If errors are detected, formatting can be stopped prior to completion, thus saving considerable time on very large runs.
The GUI also lets you save the XSL-FO file resulting from an XSLT transformation. This is very useful when you want to transmit a file for formatting, but not the XML or XSL files.
Main Window
The application window of Antenna House Formatter V7.5 consists of following elements:
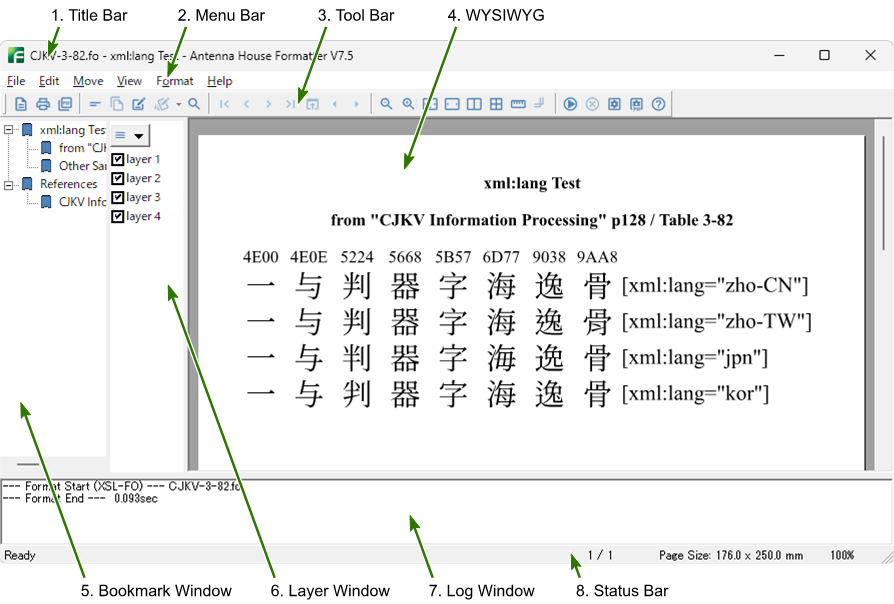
- Title Bar
The title bar shows the title of Antenna House Formatter V7.5 and the filename of the original XML document you are viewing. It may also show: a <title> of HTML; and if the FO contains a <fo:title> formatting object; or if title is specified by the <axf:document-info> extension element, then either content (HTML's <title> or <fo:title> has priority) is also displayed.

- Tool Bar
The most commonly used menu functions are available as buttons on the Tool Bar. You can easily execute these functions by one click of the mouse. ☞ [View]-[Tool Bar]
- WYSIWYG (What You See Is What You Get)
The WYSIWYG displays the formatted results. When the scroll bar is displayed on the WYSIWYG window, you can press and hold the left mouse button to use the hand tool
 as the mouse pointer to move the page around so that you can view all the areas. Note that the hand tool is not available when [Text Select] mode is selected in the Edit menu.
If you left-click on the link destination in the formatting result, it will move to that location if it is an internal link.
If it is an external link other than http or https, close the current window, open the link destination, and proceed with formatting.
If it is an http or https, it will open in a shell.
You can select how to open from the Popup Menu by right-clicking.
as the mouse pointer to move the page around so that you can view all the areas. Note that the hand tool is not available when [Text Select] mode is selected in the Edit menu.
If you left-click on the link destination in the formatting result, it will move to that location if it is an internal link.
If it is an external link other than http or https, close the current window, open the link destination, and proceed with formatting.
If it is an http or https, it will open in a shell.
You can select how to open from the Popup Menu by right-clicking.
You can format files of various types by dropping them on the WYSIWYG window. ☞ Drag-and-drop Formatting
CAUTION: Although some unsupported rendering elements may not be displayed in the GUI, there may be no problem with the output to other devices, such as PDF. - Bookmarks Window
When formatting a document that contains bookmarks, you can check how the bookmarks will be displayed. By clicking the bookmark item, you can display the link destination. Also, by right-clicking the bookmark item, you can specify how to open the link destination. ☞ [View]-[Bookmarks Window]
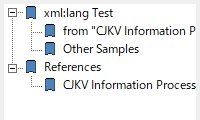
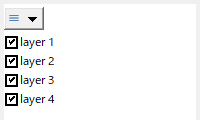
- Layer Window no-LT
When formatting a document that includes layers defined by axf:layer-settings, you can change the layer display status to check the status of each layer. By clicking the check box, you can switch between showing and hiding each layer. In the initial state, the layer with view on is checked in axf:layer-settings. You can also click the layers submenu button at the top
 to display the layer submenu, where you can switch the display according to the layer settings such as language.
☞ [View]-[Layer Window]
to display the layer submenu, where you can switch the display according to the layer settings such as language.
☞ [View]-[Layer Window]
- Log Window
When running the GUI, the location of the file that Antenna House Formatter V7.5 loads, such as version information, license file, etc. is shown. If the file does not exist, the file name is enclosed in < and >.
The log window shows a running status as the document is formatted. Minor warnings are shown here. Serious warnings are shown in a popup dialog box. The log window can hold a significant amount of status information. Older information is discarded if the information becomes too much. The last line of the log output is the time it took to format the document. The log window has its own scroll bar for viewing the log output. ☞ [View]-[Log Window]

The content in the log window can now automatically be saved to a file by click the Others tab in the Other Settings Dialog and then checking the [Output Log File] check box.
Click the link to the document displayed in the error log to edit the document using the editor specified in the Editors page in the Other Settings Dialog.
The log window can be displayed in three modes: Hide, Floating, and Docked. You can float the log window by dragging the border between the log window and the WYSIWYG window, or by selecting Floating from the View Menu. Also, if you drag the floating log window, a guide to the docking position will be displayed, and you can dock the log window by dropping it at the specified position. Leave the log window floating and select Docked from the View Menu to dock the log window where it was previously docked.
- Status Bar
The Status Bar displays the following information: ☞ [View]-[Status Bar]
- Current status of Formatter or the tool bar button function as you pass over the button with the pointer.
- Current page number/total number of pages (based on physical page count).
- The physical page size of the displayed page.
- Zoom ratio.

Tooltip
When the pointer is over an area on the WYSIWYG window, such as over a character string or an image, the information about the area is displayed as a Tooltip. Font name, size, format and size of an image that are actually used can be checked.

Multiple font names may be displayed in order to show the difference between the specified font and the font actually used:
- font-family
- The font-family specified by FO.
- font-name
- The font name actually selected. If this is the same as font-family, it is not displayed.
- display-font
- The font name that Windows selected to display the character on the screen. If this is the same as font-name, it is not displayed.
Drag-and-drop Formatting
You can format files of various types by dropping them on the WYSIWYG window. The type of the file is detected automatically as you drop it. (See Detection of Formatting Type to learn about automatic detection.) If you'd like to specify the file type, instead open the file using the Document/Stylesheet Dialog. The dropped file is added to the <Recent File> list in the File menu and its file type is also memorized. Therefore, when you drop a file that is also on the Recent File list, the same file type will be used again automatically. Formatting actions for each file type are as follows:
- FO file
- Formatting starts immediately.
- Stylesheet (XSL or CSS)
- When you drop the stylesheet on a formatted XML/HTML document, Antenna House Formatter V7.5 starts formatting the current document using the dropped stylesheet. When you drop the stylesheet and there is no current XML/HTML document, if you then drop a XML/HTML document, Antenna House Formatter V7.5 starts formatting the new document using the stylesheet.
- HTML file (without XSL/CSS specification in HTML)
- Formats the document using a default stylesheet.
- XML/HTML file (with XSL/CSS specification in XML/HTML)
- Formats the document using the stylesheet specified in the XML/HTML.
- XML/HTML file (without XSL/CSS specification in XML/HTML) + Stylesheet (XSL/CSS)
- Formats the document using the dropped stylesheet.
- XML/HTML file (with XSL/CSS specification in XML/HTML) + Stylesheet (XSL/CSS)
- Formats the document using the dropped stylesheet.
- Graphics file
- Renders graphics files in formats supported by Antenna House Formatter V7.5.
If another stylesheet is dropped when formatting a file, except for a FO or graphics file, the file can be again formatted using the stylesheet. Moreover, if a Internet shortcut (.url) file, URL character string or Shortcut link (.lnk) to a file is dropped, the target file referred to by the URL can be opened.
Menu
- File
Menu Shortcut Description 
Open... Ctrl+O Displays the Document/Stylesheet Dialog. 
Close Ctrl+W Closes the displayed formatted results. Save Area Tree... no-LT Displays the Save AreaTree Dialog. Save FOTree... Displays the Save FOTree Dialog. Save FO... Displays the Save FO Dialog. Save CSS Debug Tree... no-LT Displays the Save CSS Debug Tree Dialog. If css-debug="true" is not specified in the Option Setting File, this menu is not displayed. 
Print... Ctrl+P Displays the Print Dialog. 
PDF Output Ctrl+D Displays the PDF Output Dialog. SVG Output... Displays the SVG Output Dialog. PostScript Output... Displays the PostScript Output Dialog. XPS Output... Displays the XPS Output Dialog. Word(docx) Output... no-LT Displays the Word(docx) Output Dialog. Text Output... no-LT Displays the Text Output Dialog. Document Information... Displays the Document Information Dialog. <Recent File> Displays the files that were most recently formatted. Exit Alt+F4 Exits Antenna House Formatter V7.5. - Edit
Menu Shortcut Description 
Text Select Enables you to select the text in the WYSIWYG window with the mouse. 
Copy Ctrl+C Copies the selected text to the clipboard. Select All Ctrl+A Selects all the text shown in the formatted document in the WYSIWYG window. Deselect Cancels selection mode of the text. 
Edit Document Ctrl+U Opens the document using the editor specified in the Editors tab in the Other Settings Dialog. You cannot edit a document formatted via HTTP or HTTPS. 
Edit Stylesheet Shift+Ctrl+U Opens the stylesheet using the editor specified in the Editors tab in the Other Settings Dialog. If there are multiple related CSS style sheets, a list of them will be displayed in the submenu. You cannot edit a stylesheet via HTTP or HTTPS. Edit Default Stylesheet Edits the default stylesheet (html.css). 
Search String... Ctrl+F Displays the Search String Dialog. Search Property... Shift+Ctrl+F Displays the Search Property Dialog. Search Previous Shift+F3 Searches backwards from the position just before the search position. Search Next F3 Searches forwards from the the search position. - Move
Menu Shortcut Description 
First Page Ctrl+Home Goes to the first page. 
Previous Page Ctrl+PageUp Goes to the previous page. 
Next Page Ctrl+PageDown Goes to the next page. 
Last Page Ctrl+End Goes to the last page. When you stop formatting before it finishes, the last formatted page will be displayed. 
Go To Page... Ctrl+G Displays the Go To Page Dialog. This only functions in multi-page documents. The current page position is shown in the Status Bar. 
Back Alt+← As you move through the pages of a document, Formatter stores up to 10 moves. By using Back and Forward, you can step backwards or forwards through the pages viewed. 
Forward Alt+→ - View
Menu Shortcut Description 
Fit in Window Ctrl+0 Zooms the displayed size of the formatted page to automatically fit the entire page in the WYSIWYG window. Actual Size Ctrl+1 Sets the zoom ratio to 100%. 
Fit Page Width Ctrl+2 Automatically zooms the width of the formatted page to the width of the WYSIWYG window. 
Zoom In Ctrl++ Changes the zoom in/out %. You can change the zoom in % up to 2000% and zoom out % up to 12.5%. Values from 5% to 2000% can be entered using the Zoom Dialog. The current zoom ratio is shown in the Status Bar. 
Zoom Out Ctrl+− Zoom... Ctrl+M Displays the Zoom Dialog. 
Two Page View Ctrl+N Specifies whether to display the formatted pages on the WYSIWYG window as two facing pages or as single pages. Continuous Specifies whether to display the formatted pages on the WYSIWYG window continuously or as separate pages. Many Page View Specifies whether to display the formatted pages on the WYSIWYG window as multiple pages. 
Show Border Ctrl+B Specifies whether to display borders of areas. The displayed borders are used to confirm how the formatted result is divided in areas. The borders do not appear in any output file or when printing. This setting can also be specified in Other Settings Dialog. 
Show Ruler Ctrl+I Displays the ruler to confirm the position of the character, etc., in the document. The ruler can be moved to anywhere you like. 
Show Printer Mark no-LT Specifies whether to display printer marks. Available only when the document being formatted includes printer marks. Bookmarks Window Specifies how to display the Bookmarks Window. You can choose from three modes: Hide, Floating, and Docked. Layer Window no-LT Specifies how to display the Layer Window. You can choose from three modes: Hide, Floating, and Docked. Tool Bar Specifies whether to show or hide the Tool Bar. Status Bar Specifies whether to show or hide the Status Bar. Log Window Specifies how to display the Log Window. You can choose from three modes: Hide, Floating, and Docked. Full Screen no-LT F11 / Ctrl+L Makes the screen in full screen mode. You can go to full screen mode when any document is open. Full screen mode is canceled when the document is closed. You can also exit full screen mode by pressing ESC / F11 / Ctrl+L. Pages can be moved with the mouse or shortcut keys. - Format
Menu Shortcut Description 
Format F5 / Ctrl+R Formats the current document (FO or XML+XSL, etc.). 
Stop Formatting Shift+F5 Stops formatting. In a large multi-page document, the pages can be browsed as they are formatted. If errors are detected, you can stop the formatting prior to completion. Analyze Page no-LT Analyzes the current page. The analyzer results are reported in the log window and shown as red marks on the page. 
Format Option Setting... Shift+Ctrl+O Displays the Format Option Setting Dialog. 
PDF Option Setting... Shift+Ctrl+P Displays the PDF Option Setting Dialog. Other Settings... Shift+Ctrl+T Displays the Other Settings Dialog. Import Option Setting... Displays the Import Option Setting Dialog. Export Option Setting... Displays the Export Option Setting Dialog. Reset Option Setting... Resets the Option Setting File back to the default and reloads the settings. Edit Option Setting File no-LT Shift+Ctrl+D Edits the Option Setting File. The Option Setting File will not automatically be read after editing. It will be reflected when rerunning the application. Reload Hyphenation Dictionary Reloads Hyphenation Dictionary and formats the document again. Edit Font Configuration File no-LT Edits the Font Configuration File. The Font Configuration File will not automatically be read after editing. It will be reflected when rerunning the application. - Help
Menu Shortcut Description 
Open Manual F1 Displays this Manual. Open Online Manual Displays the Latest Manual on the Internet. Sample Page Displays the Antenna House Formatter Samples on the Internet. Mail to Support no-LT Sends an email to Antenna House Support. The required information such as serial number, etc., is embedded automatically. This is not available with either the evaluation version or Antenna House Formatter V7.5 Lite. Antenna House website Opens the Antenna House website in your web browser. About Antenna House Formatter V7.5... Shift+F1 Displays the About Dialog of Antenna House Formatter V7.5.
Popup Menu
The following popup menu/boxes are displayed in the GUI.
| Menu | Description |
|---|---|
| Open... | Displays the Document/Stylesheet Dialog. |
| <Recent File> | Displays the files that were most recently formatted. |
The following pop-up menus appear when a document is open.
| Menu | Description |
|---|---|
| Copy | Copies text selected. |
| PDF Output | Displays the PDF Output Dialog. |
| Format | Formats the current document (FO or XML+XSL etc.). |
| Stop Formatting | Stops formatting. |
| Open Link | Opens the the link under the pointer and formats the destination file in the current window. |
| Open New Window | Opens and formats either the link under the pointer or the current document in a new window. |
| Shell Open | Opens either the link under the pointer or the current document with the Windows application for its file type. |
| <Recent File> | Displays the files that were most recently formatted. |
The following pop-up menus appear in full screen mode. no-LT
| Menu | Description |
|---|---|
| Format | Formats the current document (FO or XML+XSL etc.). |
| Stop Formatting | Stops formatting. |
| Show Border | Shows the border of the area. |
| Show Ruler | Shows the ruler. |
| Show Printer Mark | Shows the printer mark. |
| Show Scroll Bar | Shows the scroll bar. |
| Show Status Bar | Shows the status bar. |
| Open Link | Opens the link under the pointer and formats the destination file in the current window. |
| Open New Window | Opens and formats either the link under the pointer or the current document in a new window. |
| Shell Open | Opens either the link under the pointer or the current document with the Windows application for its file type. |
The content in the Log Window depends on which function Formatter is performing.
The following popup menu/boxes are displayed on the Ruler.
| Menu | Description |
|---|---|
| cm | Sets the units of the ruler to cm. |
| mm | Sets the units of the ruler to mm. |
| in | Sets the units of the ruler to in. |
| pt | Sets the units of the ruler to pt. |
| pc | Sets the units of the ruler to pc. |
| px | Sets the units of the ruler to px. |
| q | Sets the units of the ruler to q. |
| Reset | Resets the position of the ruler to its default. |
| Hide | Hides the ruler. |
The following pop-up menus appear in the bookmark item in the Bookmarks Window.
| Menu | Description |
|---|---|
| Open Link | Opens the bookmark link in the current window. |
| Open New Window | Opens the bookmark link in a new window. |
| Shell Open | Opens the bookmark link in a shell. |
Layer Submenu no-LT
Clicking the Layer Submenu button
in the Layer Window displays the following menu.
| Menu | Description |
|---|---|
| Show All Layers | Displays all layers regardless of axf:layer-settings. Layers with view off are also displayed. |
| Reset Layers | Resets the layer display to its initial state. |
| Viewer | Layers with view on in axf:layer-settings are displayed. |
| Layers with print on and view on in axf:layer-settings are displayed. | |
| Export | Layers with export on and view on in axf:layer-settings are displayed. |
| Apply Zoom Value | Layers whose GUI scale factor is within that range or whose zoom is not specified are displayed when zoom is specified in axf:layer-settings. Not available when Print or Export is selected. |
| Reader Language... | The Layer Language dialog is displayed and you can switch the layer displayed by lang specified in axf:layer-settings. |
Document/Stylesheet Dialog
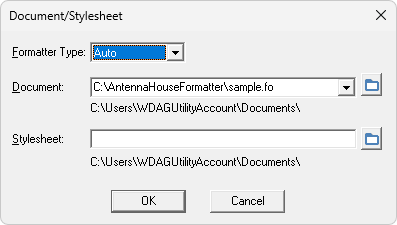
The Document/Stylesheet Dialog is used when opening a document or document plus stylesheet to be formatted.
- Format Type
Specifies the type of target document and stylesheet in the Formatter Type combo box. The following five types can be selected:
- Auto
- HTML
- XHTML
- XML+CSS
- XSL-FO
By specifying a type other than “Auto”, you can avoid possible misdetection of the type of format. For example, you can specify the type of format as “XML+CSS” for a document that might be detected as XHTML by the auto detection. When the specified type of format differs from the actual type, it is considered “Auto” and the type of format is detected automatically. See also Detection of Formatting Type.
-
Document
Specifies the target FO, XML or HTML document. Specified files can reside on the local file system, the network or over the internet. Files over the internet can be specified with a URL via HTTP.
Recently used files are listed in the Document drop-down list. Although XML files and stylesheets are specified in pairs, only previously used XML documents are listed in the drop-down list. However, the previously used stylesheet can be inserted in the Stylesheet combo box automatically when the XML document is selected.
-
Stylesheet
Specifies the XSL stylesheet or CSS. FO files can only be specified in the document box.
The directory displayed under the each edit box indicates the base directory that will be used with a relative path in the edit box.
Click [OK] to start formatting.
Antenna House Formatter V7.5 determines the file type based on its content. If a stylesheet is called from within an document, then it is not necessary to separately specify the stylesheet. The specified stylesheet is used automatically.
Save AreaTree Dialog no-LT
The Area
| CAUTION: | AreaTree can be very large. The formatted results cannot be guaranteed. |
|---|
Saving and loading the AreaTree is not available with Antenna House Formatter V7.5 Lite.
Save FOTree Dialog
In processing an FO or XML and XSL file Formatter first complete the FO file by adding properties, adding the elements omitted in the loaded FO or the resulting FO of the XSLT transformation and removing unused elements. The AreaTree is generated by evaluating this completed FO. Press the [Save] button to save the FO that was made at this time. When you format a document from the AreaTree, this menu cannot be selected. it's not available to format in CSS with the Lite version.
Save FO Dialog
This menu item lets you save an FO file that is the result of the XSLT transformation of the XML and XSL files that is being formatted. This menu is only available for files formatted from XML and XSL files.
Print Dialog
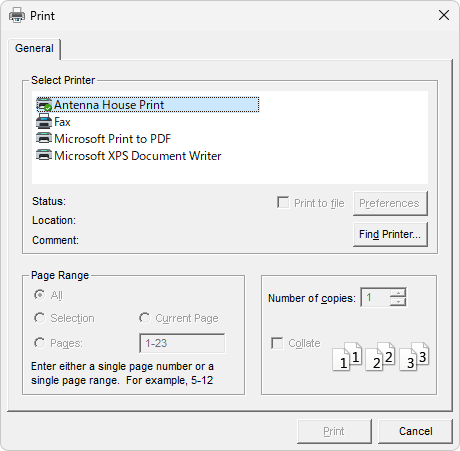
Output the formatting result to any printer installed on your Windows system. The formatting result on the screen may not be all pages, but prints all the pages. When the volume exceeds the range of the formatting result on the screen, Antenna House Formatter V7.5 outputs it while reformatting it from the first page (the page printed at this time is discarded from the memory). Therefore, it may take longer than the formatting result on the screen. The border to confirm the area will not be printed.
See also Restrictions regarding print.
PDF Output Dialog
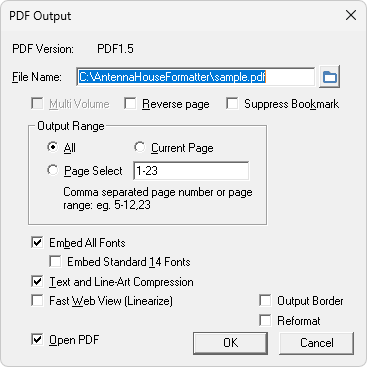
Output the formatting result in PDF. The formatting result on the screen may not be all pages, but outputs all the pages in PDF. When the volume exceeds the range of the formatting result on the screen, Antenna House Formatter V7.5 outputs it while reformatting it from the first page (the page outputted at this time is discarded from the memory). Therefore, it may take longer than the formatting result on the screen. The border to confirm the area will not be output.
- Multi Volume no-LT
Specifies whether to produce multiple volumes. Available only when the FO includes an <axf:output-volume-info> extension element that enables output as multiple separate volumes.
CAUTION: The output in multiple separate volumes is not available with the AreaTree formatting. CAUTION: The output in multiple separate volumes is not available with CSS formatting. -
Reverse page
Outputs pages to PDF in reverse order, from the end page to the start page.
-
Suppress Bookmark
no-LT
Suppresses the output of the bookmark.
- Output Range
Specifies the range to output. When outputting in multiple separate volumes, specifies the volume number. Otherwise, specifies the page number or page range separated by commas. When outputting in multiple separate volumes, if you specify 0 or greater than the actual volume number in [End], the output range continues to the end. For page range syntax, see the -page parameter in the Command-line Interface. They indicate a physical position independent of axf:initial-volume-number or initial-page-number.
-
Embed All Fonts
Embedding fonts in a PDF makes it possible to create a PDF that can be browsed anywhere and that is independent of the fonts available on the local machine. This is particularly important when generating multilingual PDF files. The drawback is that embedded fonts can substantially increase the size of the PDF file. This option is not available when the PDF format is PDF/X, PDF/A or PDF/UA, since PDF/X requires that all embeddable fonts are embedded.
- Embed Standard 14 Fonts
Usually, Standard 14 Fonts are not embedded even if the [Embed All Fonts] check box is checked, However, by checking the [Embed Standard 14 Fonts] check box, Standard 14 Fonts can be embedded. When PDF/X, PDF/A or PDF/UA is specified to create, Standard 14 fonts are embedded. At that time, the check box is displayed in gray color.
- Text and Line-Art Compression
Selecting this option makes the PDF file more compact by compressing the text and line-art.
- Fast Web View
no-LT
Generates Linearized PDF. In PDF's character, it cannot be optimized unless once usual PDF is generated. Therefore, although the generation of the Linearized PDF requires time rather than usual, the display of the generated PDF on the Web will be in high-speed.
- Open PDF
Opens the created PDF using the application associated with extension .pdf (in many cases, it is Adobe Acrobat or Reader).
Changes made in PDF Output Dialog are temporary and do not affect the much more comprehensive PDF Option Setting File under the Format Menu. Specify the detailed settings regarding PDF output in the PDF Option Setting Dialog.
See PDF Output to learn more about the outputted PDF.
SVG Output Dialog
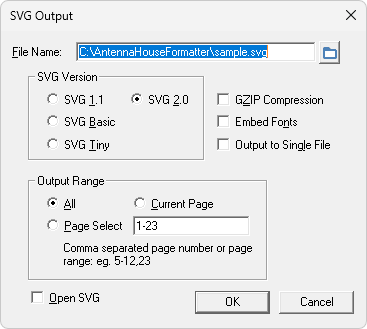
Output the formatting result in SVG. The formatting result on the screen may not be all pages, but outputs all the pages in SVG. When the volume exceeds the range of the formatting result on the screen, Antenna House Formatter V7.5 outputs it while reformatting it from the first page (the page outputted at this time is discarded from the memory). Therefore, it may take longer than the formatting result on the screen. The border to confirm the area will not be output.
- SVG Version
Selects the version of SVG to output from the following:
- SVG 2.0
- SVG 1.1
- SVG Basic
- SVG Tiny
- Output Range
Specifies the range to output. This feature is not available with the evaluation version.
- GZIP Compression
Outputs GZIP compressed svgz. The extension is set to .svgz.
- Output to Single File
Specifies whether pages are outputted as one SVG file, or each page is outputted as an individual file when outputting two or more pages. When outputting two or more SVG, page numbers are placed before the extension of the output file name. For example, if the specified file name is document.svg, page numbers are put as document1.svg, document2.svg, and so on. The number format can be set in Option Setting File, etc.
- Open SVG
Opens the created SVG using the application associated with extension .svg.
Changes in SVG Output Dialog are temporary and are not reflected to the Option Setting File. See also SVG Option in the Other Settings Dialog.
See SVG Output to learn more about the outputted SVG.
PostScript Output Dialog
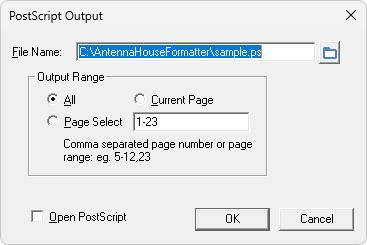
Output the formatting result in PostScript. The formatting result on the screen may not be all pages, but outputs all the pages in PostScript. When the volume exceeds the range of the formatting result on the screen, Antenna House Formatter V7.5 outputs it while reformatting it from the first page (the page outputted at this time is discarded from the memory). Therefore, it may take longer than the formatting result on the screen. The border to confirm the area will not be output.
- Output Range
Specifies the range to output. This feature is not available with the evaluation version.
- Open PostScript
Opens the created PostScript using the application associated with extension .ps.
See Post
XPS Output Dialog
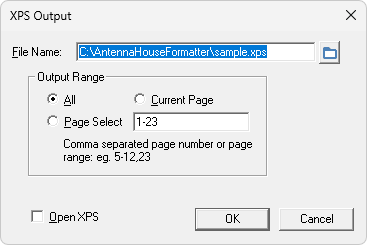
Output the formatting result in XPS (XML Paper Specification). The formatting result on the screen may not be all pages, but outputs all the pages in XPS. When the volume exceeds the range of the formatting result on the screen, Antenna House Formatter V7.5 outputs it while reformatting it from the first page (the page outputted at this time is discarded from the memory). Therefore, it may take longer than the formatting result on the screen. The border to confirm the area will not be output.
- Output Range
Specifies the range to output. This feature is not available with the evaluation version.
- Open XPS
Opens the created XPS using the application associated with extension .xps.
See XPS Output to learn more about the outputted XPS.
Word(docx) Output Dialog
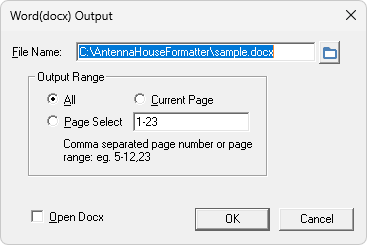
Output the formatting result in WordprocessingML of OOXML (Office Open XML). The formatting result on the screen may not be all pages, but outputs all the pages in Word (docx). When the volume exceeds the range of the formatting result on the screen, Antenna House Formatter V7.5 outputs it while reformatting it from the first page (the page outputted at this time is discarded from the memory). Therefore, it may take longer than the formatting result on the screen. The border to confirm the area will not be output. no-LT
- Output Range
Specifies the range to output. This feature is not available with the evaluation version.
- Open Docx
Opens the created Word(docx) using the application associated with extension .docx.
See Word(docx) Output to learn more about the outputted Word(docx).
Text Output Dialog no-LT
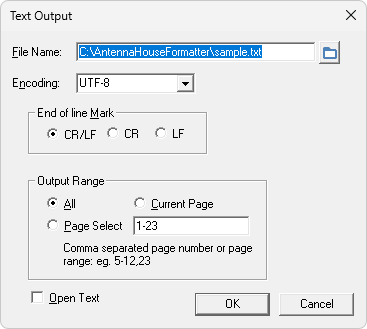
The TEXT Output Menu enables outputting the formatted results to plain text format.
-
Encoding
Specifies the encoding of the output text. The defaults value is UTF-8. Choose one from the list or input a encoding you want to specify. See encoding attribute on TEXT Output Settings about the value which can be specified.
-
End of line Mark
Selects the type of “End of line Mark” from the following:
- CR/LF
- CR
- LF
-
Output Range
Specifies the range to output. This feature is not available with the evaluation version.
- Open Text
Opens the created Text file using the application associated with extension .txt.
See TEXT Output to learn more about the outputted TEXT. Text output cannot be performed with Antenna House Formatter V7.5 Lite.
Document Information Dialog

Some document information specified in the document is displayed. You can change the setting here and have it reflected in the PDF output. Changes are not reflected in the original document.
In FO, document information is specified by the axf:document-info extension element.
- Title
Information for the document-title is displayed. - Subject
Information for the subject is displayed. - Keywords
Information for the keywords is displayed. - Page
Mode
Information for the pagemode is displayed. - Open
Action
Information for the openaction is displayed. - Duplex Mode no-LT
Information for the duplex is displayed. Effective with PDF1.7 or later. Invalid with Antenna House Formatter V7.5 Lite. - Binding no-LT
Information for the binding is displayed. Invalid with Antenna House Formatter V7.5 Lite.
For more details, see axf:document-info.
Search String Dialog

Specify a sequence of characters to search. This dialog continues being displayed until it closes. When some characters have found in the last searching, the seach restarts from the following character. For example, when ABCDE is searched and is found, the next searching starts from B. When having found nothing, the searching begins from the first or the last page. In order to cancel the highlight of a searching result, click anywhere on the GUI screen.
- Ignore Case
Searches a sequence of characters without distinguishing upper-case and lower-case. It is applied to all Latin alphabets, Cyrillic alphabets, etc. that have uppercase and lowercase characters.
- First Page / Last Page
When these check boxes are checked, the seach starts from the first or the last page. When the Reverse check box is unchecked, the display of the check box on the left side changes to [First Page]. When the Reverse check box is checked, the display of the check box on the left side changes to [Last Page].
- Reverse
When the [Reverse] check box is checked, it starts searching toward the first page.
This search function has the following restrictions:
- Impossible to search neither what has been deleted such as a white space, nor the strings summarized to one.
- Impossible to search the strings whose spelling has changed by the hyphenation.
- Impossible to search the original text transformed under the XSL specification.
Search Property Dialog
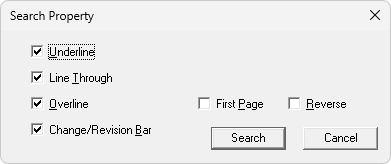
Specify a property to search. This dialog continues being displayed until it closes.
- Underline
/ Line Through
/ Overline
/ Change/Revision Bar
Specify a property to search.
- First Page / Last Page
When these check boxes are checked, the seach starts from the first or the last page. When the Reverse check box is unchecked, the display of the check box on the left side changes to [First Page]. When the Reverse check box is checked, the display of the check box on the left side changes to [Last Page].
- Reverse
When the [Reverse] check box is checked, it starts searching toward the first page.
Go To Page Dialog
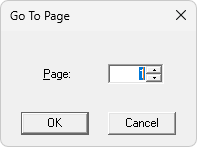
Used to specify the page number to go to and can be from 1 to the total number of formatted pages displayed in the Status Bar.
Zoom Dialog
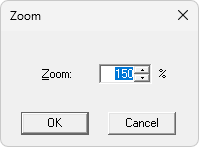
Specifies the zoom ratio. Can be set from 5% to 2000%.
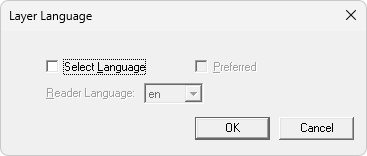
Layer Language Dialog no-LT
Specifies which language of the layer to display when lang is specified in axf:layer-settings.
-
Select Language
For layers whose display status are specified in the Layer window or Layer submenu, the displayed layer can be switched by the lang specified in axf:layer-settings.
-
Reader Language
Selects the language of the layer you want to display from the list. The list includes the following languages: (Settings that are equivalent in terms of specifications, such as en-us, en-USA and ENG-us, are grouped together.)
- GUI language: The language specified in [Language] in Others in Other Settings Dialog. This does not include the country code like en or ja.
- Language specified in the root element of the document: Settings of xml:lang, etc. If not specified, it's not included in the list.
- Language specified by lang in axf:layer-settings.
Layers are selected as follows according to the language selected from the list. (Regarding the consistency between the language code and the country code, differences in uppercase and lowercase letters, 2-letter code and 3-letter code are ignored.)
- Layers without lang specified in axf:layer-settings.
- When the country code is not included, such as en: The layer whose lang in axf:layer-settings matches it exactly, or a layer where the language code of lang matches and preferred is specified is selected.
- When the language code and the country code are included, such as en-US: The layer whose lang in axf:layer-settings matches it exactly is selected. If nothing is selected, a layer of lang with that language code only, or a layer where the language code of lang matches and preferred is specified is selected.
-
Preferred
Specifies whether to select layers only by language code and not by country code. For example, when en-US is selected, it will be considered en for layer selection.
Format Option Setting Dialog
By default if the AHFSettings.xml file exists in the application data directory this file is automatically loaded as the Option Setting File when running the application. The application data directory is [APPDATA]\AntennaHouse\Formatter\7.5\ indicated by the environment variable, APPDATA. If you want to load the other setting file, click Import Setting Files on the Format menu. Through the Format Option Setting Dialog, formatting items in the Option Setting File can be modified. Once changes are made through the Format Option Setting Dialog, click [OK] to write the changed items to the AHFSettings.xml file that exists in the application data directory.
Font
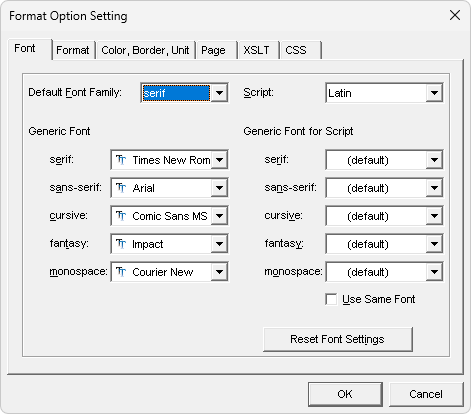
The font selection drop-down list displays fonts installed in Windows plus fonts specified in the Font Configuration File. An icon indicating the font type is displayed at the head of the list.


For fonts that are not installed in the Windows, “*” is appended at the end of the font name.
- Default Font Family
Specifies the generic font family to use automatically when there is no setting of the font family in the FO or CSS. If a generic font family is specified in the FO or CSS, this setting is ignored. The following five generic font families can be defined:
- serif
- sans-serif
- cursive
- fantasy
- monospace
For more details, see the following [Generic Font].
- Generic Font
Maps actual fonts to each generic font family. Generic font families specified in the FO replace those specified here. These settings are adopted for those generic font families not specified in the FO or CSS.
<fo:block font-family="serif">Generic font families are symbolic names defined in CSS2 Specification. XSL Specification derives the generic font family from the CSS2 Specification.
Serif font families are fonts which have a slight projection at the end of a letters/glyphs such as Japanese Mincho and Times New Roman. Sans-serif font families have plain stroke endings for their letters/glyphs and corresponds to fonts such as Japanese Gothic, Helvetica and Arial. Cursives are font families that have connected strokes and Italic typefaces for its glyphs such as Japanese Soushotai. Fantasy fonts are primarily decorative. Monospace is a font family that its font pitch is fixed, such as Courier.
- Script
The Script setting lets you set the generic font families to be used for 10 different writing systems. This includes Japanese, Chinese Simplified, Chinese Traditional, Korean, Latin, Cyrillic, Greek, Arabic, Hebrew and Thai. Each of the 10 writing systems can have its own set of generic font families defined.
- Generic Font for Script
Fonts specified in the FO or CSS supersede the Generic Font settings. When fonts are not defined in the FO or CSS then these settings are adopted.
The following examples illustrate which fonts would be used if serif was specified as the generic Font, the font-family and script properties are not specified in FO or CSS, and the script for the text is unclear.
- <fo:block>TEXT...
The font specified in the serif combo box in Generic Font is used for the TEXT.
- <fo:block font-family="sans-serif">TEXT...
The font specified in the sans-serif combo box in Generic Font is used for the TEXT.
- <fo:block script="Jpan">TEXT...
The font specified in the serif combo box in Generic Font for Serif for Japanese is used. If it is not specified, the font specified in the serif combo box in Generic Font is then used.
- <fo:block script="Jpan" font-family="sans-serif">TEXT...
The font specified in the sans-serif combo box in Generic Font for sans-serif for Japanese is used. If it is not specified, the font specified in the sans-serif combo box in Generic Font is then used.
For more details, see Font Selection to learn how to select fonts.
- <fo:block>TEXT...
- Use Same Font
Specifies whether to use the same font to the generic font for script. If the same font is used, the font that was specified for serif will also be used for the other scripts.
- Reset Font Settings
Check Reset Font Settings to reset all font settings to the default.
Format
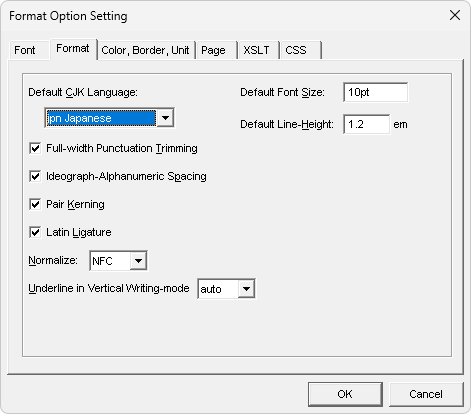
- Default CJK Language
When the script is not explicitly specified, there may be cases where it is hard to distinguish CJK (Chinese/Japanese/Korean) in Kanji. In such cases, the setting here is adopted. Select the appropriate CJK language from the following. In the Option Setting File, the setting can be changed by default-CJK.
- jpn Japanese
- kor Korean
- zho-CN Chinese Simplified
- zho-TW Chinese Traditional
- Full-width Punctuation Trimming
Specifies whether to trim the full-width punctuation in Japanese. This setting affects the value of the extension properties, axf:punctuation-trim="auto" and axf:text-justify-trim="auto".
- Ideograph-Alphanumeric Spacing
Specifies whether to add space between Japanese text and Western text. This setting affects the value of the extension properties axf:text-autospace="auto". When checked this, it is equivalent to axf:text-autospace="ideograph-numeric ideograph-alpha".
- Pair Kerning
Specifies whether to process pair kerning. This setup affects the value of the axf:kerning-mode="auto" extension property.
- Latin Ligature
Specifies whether to process ligatures for European languages. This setup affects the value of the axf:ligature-mode="auto" extension property.
- Normalize
no-LT
Specifies whether to normalize Unicode (UAX#15: Unicode Normalization Forms) for texts in FO and XML. This setting affects the value of the extension property axf:normalize="auto".
- Underline in Vertical Writing-mode
Specifies whether to place the underline on the right side of the text or on the left side of the text in vertical writing-mode. When “auto” is specified, if the language in the language property is Japanese (jpn) or Korean (kor), the underline is placed on the right side. If there is no language property specified, it depends on the standard CJK language setting. This setting affects the value of the extension property axf:vertical-underline-side="auto".
- Default Font Size
This setting is used to specify the font size when the font-size is not specified in the FO or CSS.
- Default Line-Height
This setting is used to specify the line-height to be used when specified as a property in the FO or CSS. The value must be specified as a ratio against the font size in ems.
Color, Border, Unit
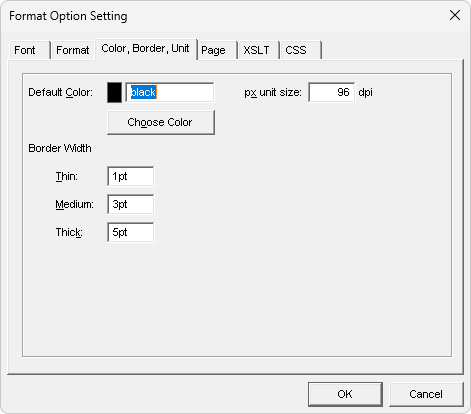
- Default Color
Specifies the foreground color to be used when the color property is not specified in the FO or CSS. Function values, such as rgb-icc() can be specified. For example when specifying as cmyk(0,0,0,1), it'll be K100. it's possible to choose the color by a button. The indicated color sample is RGB. When specifying the color other than RGB or the color including alpha value, an approximate color will be displayed.
- Border Width
Specifies the actual border width of the three symbolic values; thin, medium and thick that can be written in FO or CSS.
<fo:block border-width="thin"> - px unit size
Specifies the conversion factor for px (pixel) units written in FO or CSS as a point number per inch. This value is actually used when rendering on the screen, PDF, etc..
Page
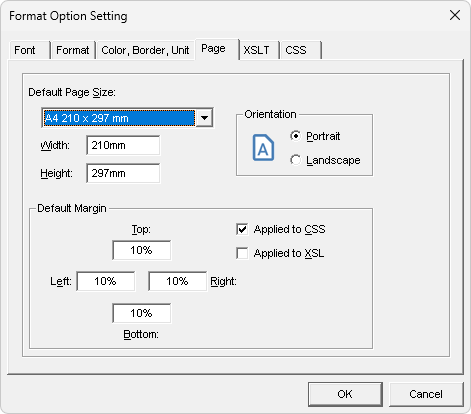
- Default Page Size
Specifies the page size to be used when the page-width and page-height properties are not specified in the FO or CSS. The page size selected from the combo boxes reflects the [Width] and [Height]. The page size can be changed arbitrarily. If you change the orientation of the page in the [Orientation] in this dialog, the value of the [Width] and [Height] are swapped.
- Default Margin
Specify the margin of a page applied to FO or CSS when there is no specification of the margin.
- Applied to CSS
When there is no margin specification by @page in CSS, the value specified in Default Margin is applied to CSS. The margin becomes zero when there is no check.
- Applied to XSL
When there is no margin specification in fo:simple-page-master in XSL, the value specified in Default Margin is applied to XSL. The margin becomes zero when there is no check.
XSLT
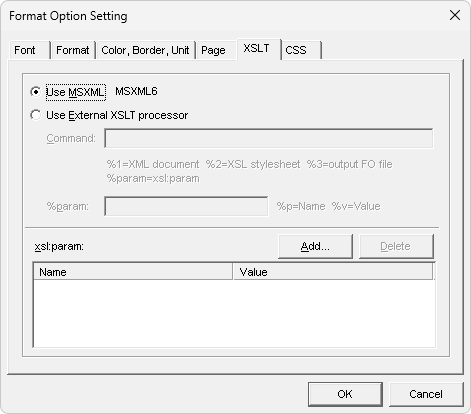
Specifies the settings regarding XSLT Processors. For more details, see also XSLT Settings.
- Use MSXML
Select the [Use MSXML] check box to use MSXML as the XSLT Processor.
CAUTION: XSLT conversion may fail with the strengthened security in MSXML6. For example, an XSLT that includes <xsl:script language="JScript"> may produce an error. Adjust the MSXML settings in the Option Setting File. - Use External XSLT Processor
Select the [Use External XSLT Processor] check box to use an external XSLT Processor. You have to specify the command-line format of the XSLT Processor to use in [Command] and specify the Parameter format of xsl:param in [%param]. If the command-line format is not specified, then MSXML will be used.
- xsl:param
Specifies the parameter name and the parameter value of xsl:param given to an XSLT Processor. Press [Add...] to add parameters or press [Delete] to delete a selected parameter.
Example settings for some major XSLT Processors.
- msxsl
command: msxsl %1 %2 -o %3 %param %param: %p=%v - Saxon-HE 11.4
command: java -cp saxon-11.4-he.jar net.sf.saxon.Transform -s:%1 -xsl:%2 -o:%3 %param %param: %p=%v - Saxon-HE 10.9N
command: Transform -s:%1 -xsl:%2 -o:%3 %param %param: %p=%v - libxslt
command: xsltproc --output %3 %param %2 %1 %param: --param %p %v
| CAUTION: | The examples shown here are provided as a guide and may be inaccurate. See the official site and the documentation for your XSLT processor. |
|---|
CSS
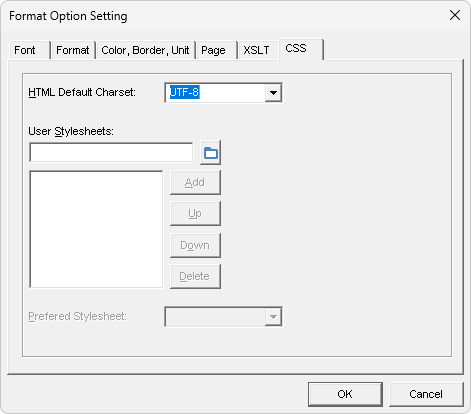
Settings of CSS for HTML.
- HTML Default Charset
Specifies the default charset of HTML. The default value is UTF-8. Choose one from the list or input a charset you want to specify. The character set in the Supported Encoding can be specified.
- User Stylesheets
Sets CSS that the user uses. The stylesheets specified here are applied in the specified order after applying the default stylesheet (html.css). See also Cascading Order of CSS. Sample user stylesheets can be downloaded from:
PDF Option Setting Dialog
You can use the PDF Option Setting Dialog to set items in the Option Setting File related to PDF. When you click the [OK] button, your changes made here are written out to the AHFSettings.xml in the application data directory.
Version
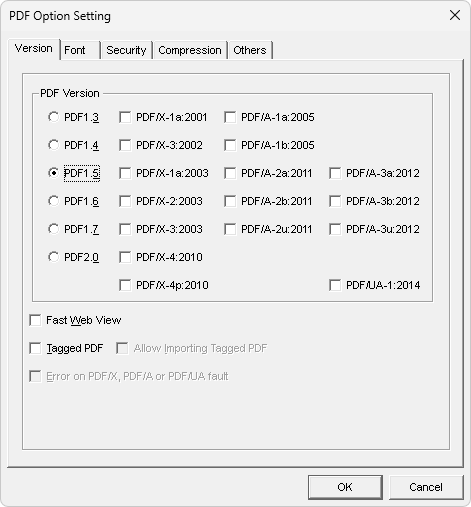
- PDF Version
Selects the PDF version to output from the following:
PDF Version Specification PDF1.3 Acrobat 4.0 PDF1.4 Acrobat 5.0 PDF1.5 Acrobat 6.0 PDF1.6 Acrobat 7.0 PDF1.7 Acrobat 8.0 PDF2.0 ISO 3200-2:2017 PDF Version Specification PDF/X-1a:2001 no-LT ISO 15930-1:2001 PDF/X-3:2002 no-LT ISO 15930-3:2002 PDF/X-1a:2003 no-LT ISO 15930-4:2003 PDF/X-2:2003 no-LT ISO 15930-5:2003 PDF/X-3:2003 no-LT ISO 15930-6:2003 PDF/X-4:2010 no-LT ISO 15930-7:2010 PDF/X-4p:2010 no-LT PDF/A-1a:2005 no-LT ISO 19005-1:2005 PDF/A-1b:2005 no-LT PDF/A-2a:2011 no-LT ISO 19005-2:2011 PDF/A-2b:2011 no-LT PDF/A-2u:2011 no-LT PDF/A-3a:2012 no-LT ISO 19005-3:2012 PDF/A-3b:2012 no-LT PDF/A-3u:2012 no-LT PDF/UA-1:2014 no-LT ISO 14289-1:2014 In the Option Setting File, this can be specified by setting the value of the pdf-version.
PDF/X and PDF/A cannot be selected with Antenna House Formatter V7.5 Lite.
- Fast Web View
no-LT
Specifies whether to generate Linearized PDF. Linearized PDF enables PDF files to be viewed much faster over the Web by enabling viewing of the PDF as soon as the first page is downloaded rather than requiring that the entire PDF file be downloaded before it can be viewed. To linearize a PDF file is a two-step process: first, a standard PDF file is produced; second, the standard PDF file is linearized. This can also be specified in the Option Setting File by setting the value of linearized.
- Tagged PDF
no-LT
Specifies whether to create Tagged PDF. Also in the Option Setting File, it can be specified by setting the value of tagged-pdf. This setting is not available when the PDF version is PDF1.3, or with Antenna House Formatter V7.5 Lite.
- Allow Importing Tagged PDF
no-LT
Specifies whether to allow Tagged PDF to be embedded within Tagged PDF. Also in the Option Setting File, it can be specified by setting the value of import-tagged-pdf. For more details, see also PDF Embedding. This setting is not available with Antenna House Formatter V7.5 Lite.
- Error on PDF/X, PDF/A or PDF/UA fault
no-LT
Specifies whether to proceed with formatting if the incompatible content cannot be avoided, for example, a non-embeddable font or any incompatible image is specified when creating PDF/X, PDF/A or PDF/UA.
- If the check box is cleared, the formatting continues, but the generated PDF may be incompatible with PDF/X, PDF/A or PDF/UA. For example, if an image is incompatible, it will be embedded as is, or otherwise, the image, format or color space will be converted according to transparency, etc. In this case, note that the color of the image may differ from the original.
- If the check box is checked, an error will be detected and a PDF file will not be generated. If the incompatible content can be avoided, it will be avoided and the formatting will be continued. For example, annotations in PDF/X will be thrown away.
Also in the Option Setting File, it can be specified by setting the value of error-on-pdfx-fault.
Font
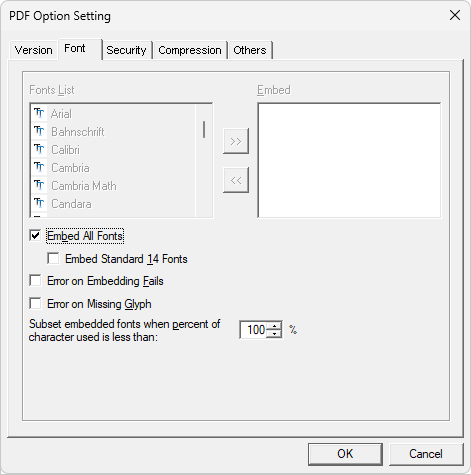
Select the target fonts you want to embed in PDF from the [Fonts List]. Press the [>>] button to move the selected fonts to [Embed]. If you want to delete fonts from [Embed], select the fonts then press the [<<] button.
Font names that appear dimmed are not available to embed. For example, if you previously added a font to the font list in the Option Setting File and that font cannot be embedded, the font name will appear dimmed in the Fonts List.
Fonts denoted with “*” are fonts that are not installed in the Windows font folder.
When the PDF version is PDF/X, PDF/A or PDF/UA, none of the items related to font embedding on this page are available.
-
Embed All Embeddable Fonts
Check [Embed All Fonts] to embed all fonts in PDF. If this option is selected, the fonts in the [Font List] and [Embed] appear dimmed. Also in the Option Setting File, it can be specified by setting embed-all-fonts.
- Embed Standard 14 Fonts
Usually, the Standard 14 Fonts are not embedded even when the [Embed All Fonts] check box is selected. However, by also selecting the [Embed Standard 14 Fonts] check box, the Standard 14 Fonts can be embedded.
-
Error on Embedding Fails
Specifies whether to break off the processing when a font specified for embedding cannot be embedded. If it is unchecked, fonts that cannot be embedded will not be embedded and processing will continue. When breaking off the processing, an error is reported and the PDF generation will stop. It can be specified by error-on-embed-fault in the Option Setting File. However, the font specified by axf:font-face is always embedded. If it could not be embedded, an error is reported and the PDF generation will stop.
- Error on Missing Glyph
Specifies whether to break off the processing and report an error when the specified font does not include a glyph corresponding to a character to be displayed. Even if PDF is generated without checking this item, the character will be displayed as either a white space or a small box in PDF for missing glyph. Also the glyph might actually not exist in the specified font even when Antenna House Formatter GUI. Also in the Option Setting File, it can be specified by setting the value of error-on-missing-glyph.
- Subset embedded fonts when percent of character used is less than:
Specifies the percent of characters used in a font above which the entire font is embedded. When the percentage of characters used is less than the specified value, Antenna House Formatter V7.5 instead embeds a subset of the font that is the characters that are actually used. Also in the Option Setting File, it can be specified by setting the value of the embed-subset-font-percentage.
Security
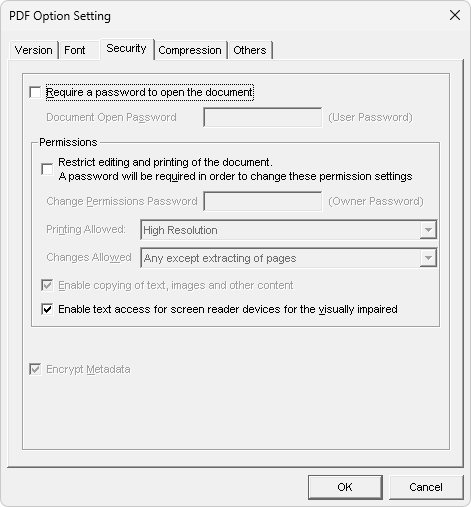
When the PDF output format is PDF/X or PDF/A, many items in this page are not available.
-
Require a password to open the document
Specifies whether a password is required to open a PDF output document.
-
Document Open Password
Specifies the password to open the PDF document. The contents of this setting is not written to the Option Setting File.
-
Restrict editing and printing of the document. A password will be required in order to change these permission settings
Specifies whether a password is required to change the restrictions on printing or editing PDF output documents. When this is not selected, there are no restrictions.
-
Change Permissions Password
Specifies the password for changing the restrictions on printing or editing PDF documents. The contents of this setting is not written to the Option Setting File.
- Printing Allowed
Specifies what printing of the PDF output documents is allowed. The available options depend on the PDF output version. Select from the following for PDF1.3:
- None
- High Resolution
Select from the following for PDF1.4 or later:
- None
- Low Resolution (150 dpi)
- High Resolution
- Changes Allowed
Specifies what changes to PDF documents are allowed. The available options depend on the PDF output version. Select from the following for PDF1.3:
- None
- Commenting, filling in form fields, and signing signature fields
- Page layout, filling in form fields, and signing signature fields
- Any except extracting of pages
Select from the following for PDF1.4 or later:
- None
- Inserting, deleting and rotating pages
- Filling in form fields, and signing signature fields
- Commenting, filling in form fields, and signing signature fields
- Any except extracting of pages
- Enable copying of text, images and other content
Specifies whether to allow copying of text, images and other content from PDF output documents to the clipboard. Note that the check box label changes when the PDF output version is PDF1.3. This setting is always effective with PDF/UA.
- Enable text access for screen reader devices for the visually impaired
Specifies whether to allow text access for screen reader devices in the PDF document. This setting is effective with PDF1.4 or later.
- Encrypt Metadata
Specifies whether to also encrypt metadata when encrypting data with a password. This setting is effective only when [Require a password to open the document] or [Restrict editing and printing of the document. A password will be required in order to change these permission settings] is checked in PDF1.5 or later. no-LT
Compression
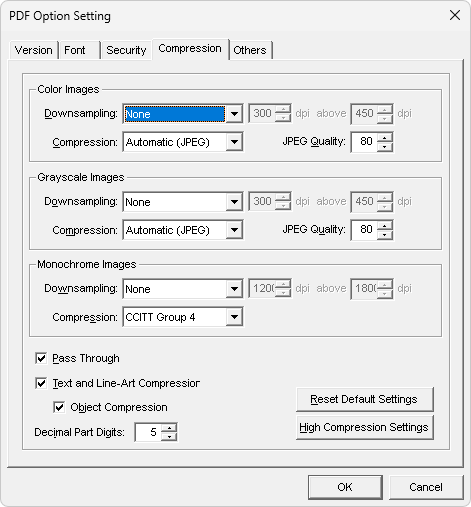
-
Color Images, Grayscale Images, Monochrome Images
These groups apply to raster images only. They specify the downsampling and compression method to apply to color images, grayscale images and monochrome images.
- Downsampling
Selects the method of a downsampling from the following:
- None
- Average
- Bicubic
- Subsampling
For values other than None, this specifies that an image with a dpi greater than the second dpi value is downsampled to the first dpi value. Also in the Option Setting File, downsampling of Color Images can be specified by setting color-downsampling; of Grayscale Images by setting grayscale-downsampling; and of Monochrome Images by setting monochrome-downsampling.
CAUTION: dpi is not the dpi the image has. It is the value calculated from the number of pixels in the image and the output size. - Compression
For color images and grayscale images, the available compression methods are:
- Automatic (JPEG)
- ZLIB
- JPEG
- JPEG 2000
- KeepLZW (JPEG)
- Automatic (JPEG 2000)
- KeepLZW (JPEG 2000)
Select Automatic (JPEG) to compress the image using either JPEG or ZLIB compression, depending on which produces the smaller image data size. When KeepLZW (JPEG) is selected, if the original image is LZW compressed, then LZW compression is used; if not, it behaves the same as Automatic. JPEG 2000 compression is not used with the Automatic option.
JPEG compression is available when the following criteria are met; if not, ZLIB compression is used.
- BitsPerComponent is 8
- The color space is any of CMYK, RGB, grayscale or CIE L*a*b*
JPEG 2000 compression is available when the following criteria are met; if not, JPEG compression is used.
- PDF version is PDF1.5 or later
- BitsPerComponent is 8
- The color space is any of RGB, grayscale or CIE L*a*b*
Automatic (JPEG 2000) and KeepLZW (JPEG 2000) are equivalent to Automatic (JPEG) and KeepLZW (JPEG) each, except that when JPEG 2000 compression is available, JPEG 2000 compression is also considered and the smaller size is adopted.
For monochrome images, the available compression methods are:
- CCITT Group 4
- CCITT Group 3
- Run Length
- ZLIB
- None
Compression will not be performed if the image data size would increase by applying compression.
In the Option Setting File, Color Images can be specified by setting color-compression; Grayscale Images by setting grayscale-compression; and Monochrome Images by setting monochrome-compression.
-
JPEG Quality
Specifies image quality of the color image and the grayscale image from 1 to 100 when JPEG compression is used. This value is converted to the compression ratio to use for JPEG 2000 compression.
The numerical value indicates the value that corresponds to -pjq of the command-line interface, etc. Also in the Option Setting File, Color Images can be specified by setting the value of the color-jpeg-quality, Grayscale Images can be specified by setting the value of the grayscale-jpeg-quality.
- Pass Through
Specify whether to embed the image that can be embedded as is in PDF as is (pass-through) upon processing it. If pass-through is not checked, the data will not be embedded as is and will be subject to compression, JPEG image quality settings, etc. If both pass-through and downsampling are specified, the downsampling will precede pass-through. In the Option Setting File, the type of image you want to pass through can be specified by using pass-through, pass-through-default and pass-through-minimum. no-LT
In the Option Setting File, when the image type to be passed through (other than all and none) is specified by using either pass-through, pass-through-default or pass-through-minimum, you can put one of the three types of checkmarks (bold, gray and no checkmarks) in the Pass Through checkbox. When the bold checkmark is given, all is specified. When the box is unchecked, none is specified. And then when the gray checkmark is given, a value other than all or none is given. This value will appear next to the Pass Through checkbox.
- Text and Line-Art Compression
Specifies whether to compress the text and the line art in the PDF to make the PDF size smaller or not. Also in the Option Setting File, it can be specified by setting the value of the text-and-lineart-compression.
- Object Compression
Specifies whether to compress objects other than text and line art in the PDF to make the PDF size smaller. It's effective only when the version of PDF to output is 1.5 or later and Text and Line Art Compression in the PDF Option Setting is checked. Also in the Option Setting File, it can be specified by setting the value of the object-compression.
- Decimal Part Digits
Specifies the number of decimal places of real numbers to be output to PDF. Also in the Option Setting File, it can be specified by setting the value of the decimal-part-digits.
- Reset Default Settings
Returns all the compression settings to the default values. In the Option Setting File, the values can be specified by using color-compression-default, grayscale-compression-default and monochrome-compression-default, etc. no-LT
- High Compression Settings
Sets the compression settings to high. When applied, the PDF file size will get smaller but the image quality will get lower accordingly. In the Option Setting File, the values can be specified by using color-compression-minimum, grayscale-compression-minimum and monochrome-compression-minimum, etc. no-LT
For details about the settings, see also Miscellaneous in PDF Output.
Others

- External Destination Link with Local File
Specifies the way to transform the external destination links with local file to the PDF link property. Select from one of the following:
- Open File
- World Wide Web Link
Also in the Option Setting File, it can be specified by setting the value of the use-launch-for-local-file.
- Color Conversion
Specifies how to convert the RGB or CMYK color space to DeviceGray or DeviceCMYK.
- No Conversion
Does nothing.
- Black to DeviceGray
Converts RGB's Black to DeviceGray before outputting.
- Gray to DeviceGray
Converts RGB's Gray color (mono tone) to DeviceGray before outputting.
- All to DeviceGray
Converts all RGB or CMYK colors to DeviceGray before outputting. This conversion is based on the following formula:
gray = 0.3×red + 0.59×green + 0.11×blue (0.0 ≤ red,green,blue ≤ 1.0)When it is CMYK, converts CMYK to RGB and then converts it to gray.
- All to CMYK
Converts the all RGB colors to CMYK before outputting. When it is CMYK, does nothing.
- All to CMYK (Black to K100)
When “All to CMYK” is specified, depending on the ICC profile, RGB black (rgb(0,0,0)) does not necessarily become K100 (cmyk(0,0,0,1)). Specifying “All to CMYK (Black to K100)” will always convert black to K100.
In the Option Setting File, it can be specified by setting the value of the color-conversion. SVG, CGM, MathML, EMF and WMF that are rendered using their original rendering engine will be converted similarly. The other image types will be processed in the following ways:
- When “All to DeviceGray” or “All to CMYK” is selected, conversion will be made to them. Note that conversion will not be made with Antenna House Formatter V7.5 Lite. no-LT
- When other than “All to DeviceGray” or “All to CMYK” is selected, no conversion will be made to them.
When PDF/X-1a is specified to create, it is considered that “All to DeviceGray” or “All to CMYK” is specified. At that time the combo box is displayed in gray color. See also PDF/X for the handling of RGB in PDF/X.
- No Conversion
- Convert Transparency to Opaque
Specifies whether to convert transparency output to PDF into opaque. Note that transparency can be specified in the Option Setting File.
- Output ICC Profile in Images
Specifies whether to output a ICC profile of images contained in an original image also to PDF. Also in the Option Setting File, it can be specified by setting the value of the image-color-profile.
If the PDF to be output is PDF/X-1a, this setting is ignored and ICC profile isn't always output.
- Output Page Labels
When FO with multiple fo:page-sequence is outputted to PDF and displayed with Adobe Acrobat or Reader, the page number in the lower part of the window is shown like 1 (1/9). This is a function of the Page Labels. If this check is turned OFF, the page label is not displayed but only the page number can be displayed. Also in the Option Setting File, it can be specified by setting the value of the page-labels.
- PDF Embedding
Specifies the embedded PDF.
- Import All Annotations
Imports all embeddable annotations contains in the embedded PDF. When specifying the embedded annotations individually, select them from the following:
- Text
- Link
- Free
Text - Line
- Square
- Circle
- Polygon
- Poly
Line - Highlight
- Underline
- Squiggly
- Strike
Out - Stamp
- Caret
- Ink
- Popup
- File
Attachment - Sound
- Movie
- Screen
- 3D
- RichMedia
- Other
Specify Other when the embedded annotation is not included in the selections. In the Option Setting File, it can be specified by setting the value of the import-annotation-types. For more details, see also PDF Embedding.
Other Settings Dialog
SVG Option
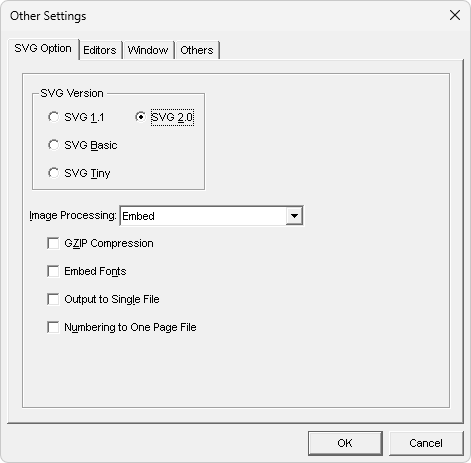
In SVG Option in the Other Setting Dialog, the item concerning SVG set in the Option Setting File is adjusted. The contents changed here are written out to the AHFSettings.xml which exists in the application data directory by clicking the [OK] button.
- SVG Version
Selects the version of SVG to output from the following:
- SVG 1.1
- SVG Basic
- SVG Tiny
- Image Processing
Selects whether to embed or link images in SVG from the following:
- Embed
- Copy and Link All Images
- Link External Images
- Copy and Link External Images
For more details, see Image Output in SVG Output.
- GZIP Compression
Outputs GZIP compressed svgz. The extension is set to .svgz.
- Output to Single File
Specifies whether pages are outputted as one SVG file, or each page is outputted as an individual file when outputting two or more pages. When outputting two or more SVG, page numbers are placed before the extension of the output file name. For example, if the specified file name is document.svg, page numbers are put as document1.svg, document2.svg, and so on. The number format can be set in Option Setting File, etc.
- Numbering to One Page File
When Output to Single File is not specified, specifies whether the number is placed to the output file name even if SVG has only one page.
Editors
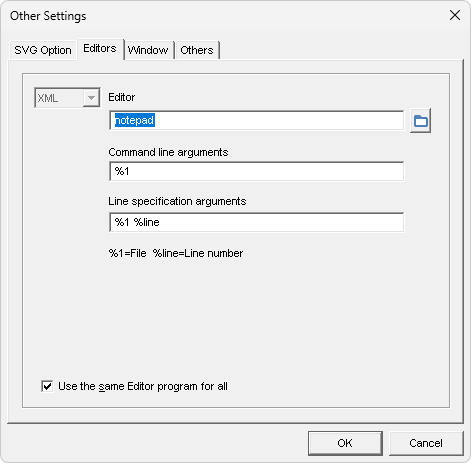
Edits the target document or stylesheet using the editor specified here. If it is empty, use the application associated with Windows. At that time, use what is associated with [Edit], if not, use what is associated with [Open]. This setting can be used from [Edit Document] on the Edit menu or [Edit Stylesheet] on the Edit menu.
Click the link to the document displayed in the log window to edit the document using the editor specified here. By specifying an argument that includes meta characters in [Line specification arguments], you can specify the line in error and edit the document. The description of meta characters is as follows:
- %1 represents the file name.
- %line represents the line number.
For example, when using oXygen as the editor, specify file:%1#line=%line in [Line specification arguments].
Window
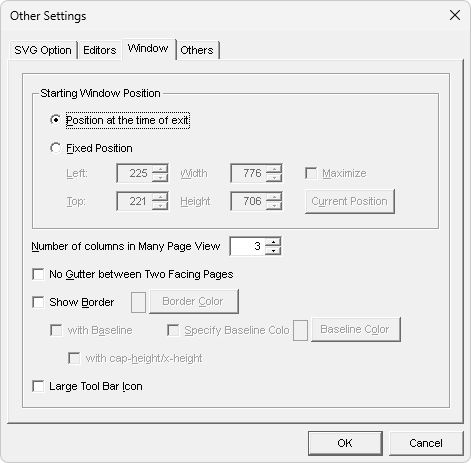
- Starting Window Position
Specifies the position of Window in GUI when running the application. Select the [Fixed Position], click the [Current Position] button to input the current information.
- Number of columns in Many Page View
Specifies the number of columns when viewing multiple pages.
- No Gutter between Two Facing Pages
Specifies whether to apply the gutter between two facing pages or not.
-
Show Border
Used to confirm how the formatted result is divided in areas. The border does not affect PDF Output or Print, etc. This is the same as the [Show Border] in the menu. In case of MathML, the border will be shown for each element.
-
Border Color
Displays the Color Dialog. Possible to specify the border color.
-
with Baseline
Specifies whether to display the text baseline in addition to the borders of areas. The border does not affect PDF Output and Print, etc.
In case of MathML, either the baseline or the centerline will be shown. no-LT -
Specify Baseline Color
Specifies the color of the baseline. If not specified, the color will be calculated from the color of the characters. no-LT
-
Baseline Color
Displays the Color Dialog. Possible to specify the baseline color. no-LT
-
Large Tool Bar Icon
Possible to increase the size of the toolbar icons.
Others
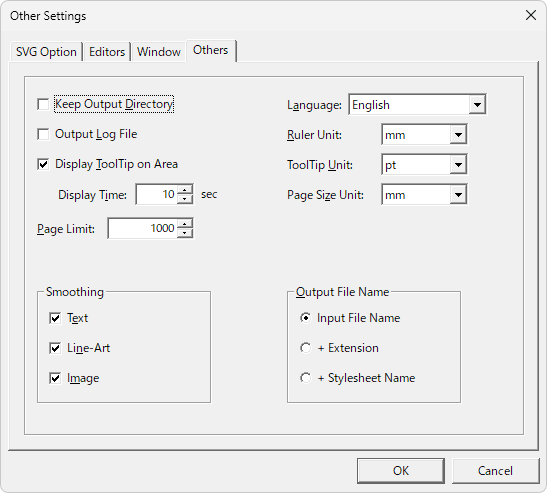
- Keep Output Directory
Specifies whether to remember the previous position of the directory used as the standard of a file name in the PDF Output Dialog, etc. If it's not checked, the same directory as the formatted document is considered.
- Output Log File
The information shown in the log window is saved as AHFormatter.log in the application data directory. The information in this file will be deleted when running AHFormatter.exe.
- Display ToolTip on Area
Specifies whether to display the information about the area as a Tool
Tip when a mouse is pointed on an area on the screen such as a character string or an image. A ToolTip automatically disappears by moving a mouse or reaching the specified display time. - Page Limit
This is used to control the maximum number of formatted pages for a very large document that a user wants to make available for display in the GUI. A large amount of memory is necessary to display a large number of pages. By specifying an appropriate value it is possible to improve the efficient working of the system. For more details, see also Restrictions. But, there is no such a restriction with other interfaces, such as Command-line Interface, etc.
- Smoothing
Specifies whether to process the anti-aliasing in the printing or GUI. This can be specified for the following.
- Text
- Line-Art
- Image
- Language
Selects the language displayed on GUI. Changes are reflected when rerunning the application.
- English
- Japanese
- System Language
CAUTION: It does not influence neither the [Cancel] button nor standard dialogs displayed by Windows. - Ruler Unit
- ToolTip Unit
-
Page Size Unit
Selects the unit of the Ruler, the unit in the Tooltip, and the unit of the page size displayed in the Status Bar from the following:
- cm
- mm
- in
- pt
- pc
- px
- q
- Output File Name
no-LT
Specifies the default format of the output file name in the PDF output dialog.
- Input File Name
Adds a target extension on the input file name after deleting the existing extension. For example when the input file name is foo.fo, it will be foo.pdf.
- + Extension
Adds a target extension on the input file name with the existing extension. For example when the input file name is foo.fo, it will be foo.fo.pdf.
- + Stylesheet Name
When a stylesheet is applied, adds a target extension on the conbined form of input file name and stylesheet name. When a stylesheet is not applied, it's the same as + Extension. For example when the input file name is foo.xml and the stylesheet is bar.xsl, it will be foo.xml+bar.xsl.pdf .
- Input File Name
Import Option Setting Dialog
This enables you to load an Option Setting File with previously saved main preferences from the Option Setting Dialog. By default if the AHFSettings.xml file exists in the application data directory this file is automatically loaded as the option setting file when running the application. The application data directory is [APPDATA]\AntennaHouse\Formatter\7.5\ indicated by the environment variable, APPDATA.
Export Option Setting Dialog
Writes the current setting to the Option Setting File. Main setting contents can be referred to in the Option Setting Dialog.
About Dialog
Displays the version of Antenna House Formatter V7.5 and the license information. If you are using an evaluation license the evaluation period remaining can be confirmed here.
Run with Parameters
You can use the parameters shown below when you run the AHFormatter.exe GUI program.
| Parameter | Default | Functions |
|---|---|---|
| -s |
If Antenna House Formatter V7.5 has already been run, the formatting will be done with the already running Antenna House Formatter V7.5.
When -d is not specified, the already running Antenna House Formatter V7.5 will format again.
When -d is specified, specification of -t -i -param is also valid and will format the document specified by -d.
If this parameter is not specified, another Antenna House Formatter V7.5 will be run. If there is no Antenna House Formatter V7.5 running, -s is invalid. | |
| -d Document | Specifies the URI of the source XML/FO/HTML document. The GUI window is displayed. | |
| -t Stylesheet | Specifies the URI of the XSL/CSS stylesheet that is used for formatting. Must be used in combination with the -d, -p or -pt parameter. | |
| -i Option-Setting-File | Specifies the path of “Option Setting File” which defines Antenna House Formatter V7.5 options in XML format. Any number of these parameters can be specified. If any content of this file is specified later, it will overwrite the previous contents. The default AHFSettings.xml is always read before this parameter. | |
| -p Document | Antenna House Formatter V7.5 prints the document by displaying the Print Dialog without also displaying the GUI window. Cannot be used in combination with the -s parameter. | |
| -pt Document Printer-Name | Antenna House Formatter V7.5 prints the document without displaying either the GUI screen or the Print Dialog. If Printer-Name is omitted, the default printer is used. Cannot be used in combination with the -s parameter. | |
| -pts Document Printer-Name | Same as the -pt parameter, but prints the document without displaying the stop dialog box while printing. If Printer-Name is omitted, the default printer is used. Cannot be used in combination with the -s parameter. | |
| -ps Printer-Setting-File | Specifies the path name of the Printer Setting File. See “Printer Setting File”. When the XML document is specified by -d, print the document by displaying the Print Dialog. | |
| -c Copies | 1 | Specifies the number of copies to print. Must be used in combination with the -pt or -pts parameter. If it's omitted, the value is counted as 1. |
| -pdf Document PDF-File | Antenna House Formatter V7.5 outputs the formatted document to PDF by displaying the PDF Output Dialog without displaying the GUI window. PDF-File can be omitted. Cannot be used in combination with the -s parameter. | |
| -pdft Document PDF-File | Antenna House Formatter V7.5 outputs the formatted document to PDF in the specified file without displaying either the GUI window or the PDF Output Dialog. Cannot be used in combination with the -s parameter. | |
| -pdfts Document PDF-File | Same as the -pdft parameter, but outputs the formatted document to PDF without displaying the stop dialog box while outputting PDF. Cannot be used in combination with the -s parameter. | |
| -param name=value | Specifies the name and value of a single xsl:param. If the value contains white space, specify as “name=value”. -param can be specified multiple times. |
- Only one of -d, -p, -pt, -pts, -pdf, -pdft or -pdfts can be specified.
Restrictions
The GUI has certain formatting restrictions that do not apply when using the other interfaces.
The maximum number of pages that can be formatted is controlled by the Others tab in the Other Settings Dialog. This is because storing formatted pages for browsing in the GUI consumes memory. Without this restriction, the system could run out of memory with very large documents.
The other, non-GUI interfaces can format very large numbers of pages because they can aggressively discard information about already formatted pages during formatting.
In the GUI, all pages can be output to PDF or to the printer regardless of this setting.
EMF and WMF rendering in the WYSIWYG window is performed using functions provided by Windows. There may be documents for which the formatted results in the GUI and the formatted results in the PDF are different. The same applies to the printing of EMF and WMF using Windows printer drivers from the GUI or the Command-line Interface.
The rendering result in the GUI and the output may differ due to the settings of glyph, smoothing, etc. or output settings in the Option Setting File. In such a case, try one of the following:
- Place the font in question in a non-Windows directory and specify it in the Font Configuration File
- Turn off Text Smoothing
There may be cases where fonts displayed in an image are dropped from PDF output. This is because Windows may have substituted the fonts used for display. Specifying the proper font-family in FO or CSS can avoid this problem.
fo:color-profile in FO and the ICC profile included in the image are not reflected on the screen.
- When the color set to output in black and white by PostScript printers does not convert to black and white, turn off all Smoothing. In addition, gradients may not print as black and white even when all smoothing is turned off.